«Цифровая рельефа модель! Ты не фетиш, и не самоцель…»
Алла Ачасова
Побудова ЦМР в ArcMap та використані параметри
Розглянемо побудову ЦМР з оцифрованих горизонталей топографічної карти засобами ArcGIS.
Завдання
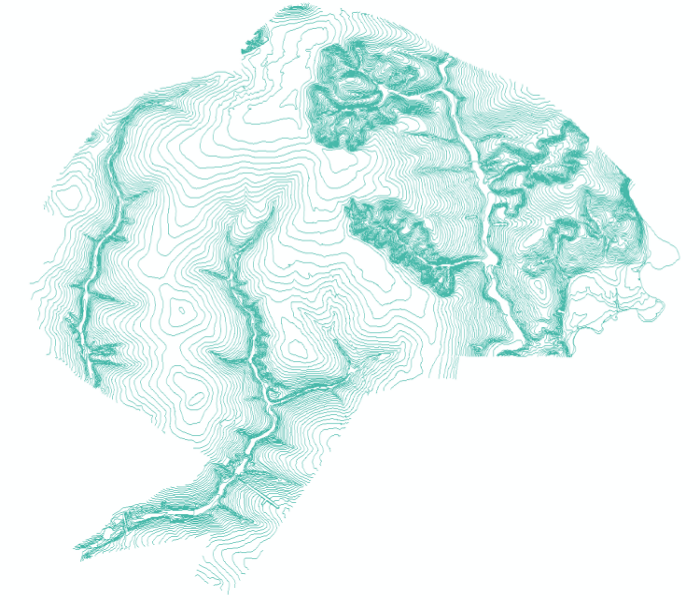
У нашому розпорядженні опинилися оцифровані горизонталі рельєфу топопланів масштабу 1:1000 для харківського Лісопарку та деяких прилеглих територій. Виник інтерес до створення цифрової моделі рельєфу на основі цих матеріалів. Під час виконання завдання ми ознайомились з наявними методами й інструментами створення ЦМР, обрали та опанували деякі з них. Дещо із цього досвіду описується у статті.
Горизонталі
Для чого?
Відволічемося трохи на те, для чого нам ЦМР і для якої території ми її робили.
Відповідь на першу частину питання можна знайти, наприклад, у постах про ЦМР у нашому блозі: 1, 2, 3.
У даному випадку нам було необхідно отримати користь із наявних у нас топокарт й отримати практику у створенні ЦМР, зробити відмивку рельєфу і використати її на карті.
Територія для обробки була досить невеликою: близько 81 км2, десь 9×15 км у найширшому місці, але при цьому дуже неправильної форми. Вона охоплює харківський Лісопарк, парк Саржин Яр та деякі прилеглі території.

Територія обробки на основі карти OSM
Для нашої території характерний слаборозчленований рівнинний рельєф, абсолютні перевищення у її межах – біля 110 метрів, найглибші балки – до 80 метрів. Більша частина території зайнята вододільними пологими рівнинами. Якщо взяти, до прикладу, ЦМР із глобальним покриттям (STRM, ASTER GDEM), то вони не забезпечують достатньої деталізації, аби бути використаними на такій території і показуватися на максимальних рівнях наближення (18-19, 1:2300 ~ 1:1130). А нам якраз необхідно було мати відмивку рельєфу як невід’ємний елемент карти навіть на найкрупніших зумах, щоб досягти ефекту занурення користувача в карту навіть на нашій, такій пласкій, території. Вхідні дані із вертикальним перерізом 2 м якраз дозволяють побудувати дуже деталізовану модель.
Вибір інструменту
Власне, вибирати доводилось між ArcGIS і відкритими програмами – QGIS/GRASS/SAGA. І хоча було прагнення обійтися виключно безкоштовним ПЗ, на жаль, це не вдалося. Вибір було зроблено на користь ArcGIS, бо безкоштовні/відкриті програми, незважаючи на свою повнофункціональність, досить складні в опануванні для новачків. Довідкові матеріали часто неповні (хоча до честі GRASS GIS варто зазначити гарну сторінку присвячену виключно створенню ЦМР з горизонталей), подекуди буває так, що опис якого-небудь модуля у GRASS-wiki дуже скупо описує призначення програми й охоплює лише частину параметрів, залишаючи решту для користувачів із досвідом у програмуванні/академічним бекґраундом або ж із дуже розвиненою інтуїцією.
Тому за наявності ліцензії ArcMap Advanced було вирішено використовувати саме цю програму, яка має добре прописану довідкову інформацію. До того ж вибору на користь ArcGIS посприяла наявність спеціального інструмента Topo To Raster, що, як стверджують розробники, призначений для роботи саме з топографічними вхідними даними для створення гідрологічно коректних моделей рельєфу. Наче, саме те, що нам треба!
Порівняння Topo To Raster із іншими інструментами
Отже, найперші фактори, які зіграли на користь застосування Topo To Raster – це наявність зрозумілого користувацького інтерфейсу та детальної документації. ESRI надає дві довідкові сторінки для свого модуля: загальний опис з параметрами і «як це працює».
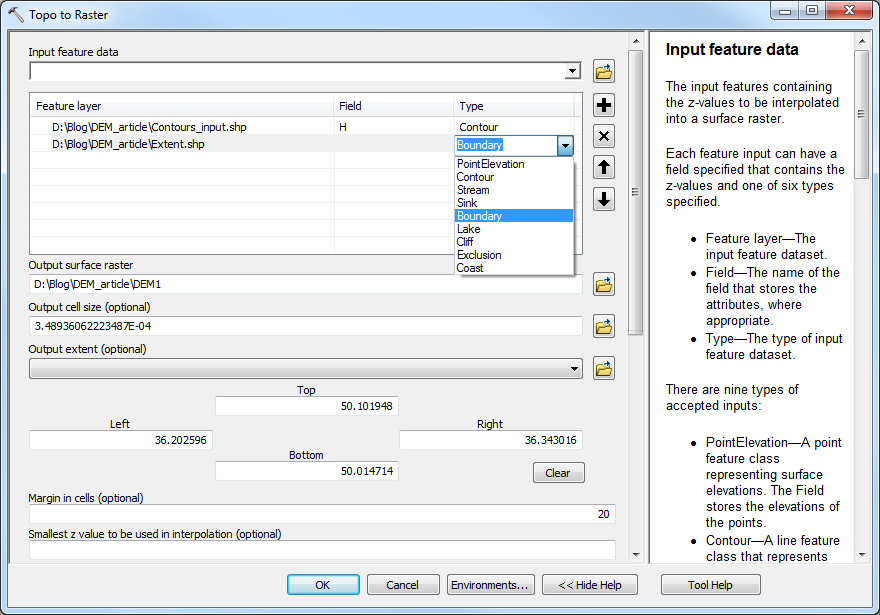
Окрім документації, на користь Topo To Raster грає різноманітність вхідних даних доступних для цього інструменту порівняно із іншими. Власне, у нашому випадку йшлося лише про самі горизонталі й межу області обробки. Останню можна задати й інструментами GRASS, але доведеться попрацювати. Тут же ми просто вибираємо шейп із екстентом довільної форми і вказуємо, що це саме межа області обробки, далі модуль Topo To Raster усе робить сам. Це, до речі, досить важлива річ при побудові ЦМР. Якщо ви створюєте ЦМР для якихось конкретних об’єктів реального світу (як-от наш Лісопарк), то доволі часто вони матимуть далеко не прямокутну форму. Можливість задати екстент неправильної форми – це часто значна економія часу обчислень. Інші інтерполяційні інструменти у тому ж ArcMap, до речі, не мають прекрасної можливості задати довільний екстент у якості вхідних даних. Ну, добре, трохи попорпавшись, ви, напевне, зможете задати цей екстент у властивовстях середовища (Environment), але ж погодьтеся, що з Topo To Raster це зробити простіше.

Межі ROI, території інтересу
На завершення варто зазначити, що Topo To Raster приймає у якості вхідних даних, окрім власне горизонталей і межі області інтересу, точкові значення висоти, лінії потоків, озера, узбережжя, лінії обривів, області виключення. У нашому конкретному випадку були лише горизонталі й екстент, але ж матеріал для додання об’єктів рельєфу – через оцифрування – теж під рукою…
Труднощі створення ЦМР з горизонталей
Коли вже починає здаватися, що у цьому пості буде лише розхваляння вже 7 разів названого модуля, варто сказати, чого ж ми так на ньому зациклилися. Власне, можна відразу сказати: тому що треба було створити ЦМР саме із горизонталей. Трохи про це.
Хоча ізолінії – мабуть, найзвичніший для сприйняття (принаймні, у наших краях) спосіб представлення рельєфу, знайомий нам із топографічних карт й інтуїтивно зрозумілої кольорової відмивки фізичних карт, все ж для комп’ютерної обробки він не є найоптимальнішим. Ця думка не є моєю власною, вона повторюється у мережі неодноразово; от хоча б на тій же сторінці про принципи роботи Topo To Raster у розділі про використання горизонталей. Спробуємо розкрити її.
Справа у тому, що створення ЦМР – це процес інтерполяції. А процеси інтерполяції, вони, знаєте, більше люблять коли вхідні дані мають рівномірне просторове поширення (в ідеалі – регулярну сітчасту структуру). Міркуйте самі: якщо ми маємо якусь регулярну сітку, то буквально простою лінійною функцією ми можемо вивести проміжні значення, потім додаємо бажаного згладжування – і вуаля! у нас є красива гладенька поверхня. Натомість ізолінії – це тип вхідних даних, які мають дуже нерівномірне просторове поширення. Проблема, як сказано на вищезазначеній сторінці, полягає у відсутності даних між горизонталями. Грубо кажучи, у нас є лінія, що являє собою множину точок, які розташовані, пардон за тавтологію, вздовж певної лінії… а між ними – нічого немає, порожнеча! Алгоритм інтерполяції, який би ми не взяли (почати знайомство із ними можна звідси) схиляється до того, що вхідні значення мають велику силу, велику вагу в розрахунках і мають, просто обов’язково будуть, бути відображені у кінцевому результаті.
До чого це все? До того, що ЦМР із горизонталей, на жаль будуть проявляти ці горизонталі чи матимуть якісь інші спотворення, або «артефакти». Добре роздивитися різні артефакти на ЦМР можна на уже зазначеній сторінці GRASS-wiki. Так, на жаль, Topo To Raster теж дає модель, яка не позбавлена артефактів, але за великим рахунком, модель рельєфу виглядає дуже реалістично і правильно. Артефакти нашої моделі – це «ребра», які ми бачимо там, де у нас були вхідні горизонталі.

Деталь ЦМР із накладеним шейпом горизонталей
Також інколи мають місце несистематичні артефакти, спричинені якимось спотвореннями у вхідних даних.

Артефакт
Більш специфічно/належно для інтерполяційних алгоритмів, аніж горизонталі
…використовувати точки! В ідеальному світі, ми зробили б LiDAR-зйомку і займалися обробкою хмари точок… Але навіть за відсутності таких ресурсів слід звернути увагу саме на набори точкових даних. Принаймі тому, що більшість звичайних алгоритмів інтерполяції працюють саме з точками. Для IDW, Kriging, Spline та ін. у довідці ESRI зазначено саме «вхідний набір точкових даних». Ну а вже неодноразово згадана сторінка GRASS-wiki повідомляє, що для багатьох наведених там алгоритмів горизонталі треба растеризувати, себто ми отримаємо чарунки растру, які вже точно не є зв’язаними лінійними об’єктами.
Отже, чи можемо ми отримати точкові дані з топокарти, щоб використати менш специфічний інструмент, коли у нас немає ліцензії на використання Topo To Raster? – Так.
Як повідомляє, наприклад, ця японська методичка (англійською мовою), ми можемо оцифрувати лише вершини, западини і точки перегину горизонталей. Крім того, можна використовувати, наприклад, точкові GPS-обміри висот. …або почекати, допоки замовити радарну зйомку буде так само легко, як замовити суші додому. Із точковими даними можна використати менш специфічні методи інтерполяції, які втім, якщо вони не проектовані саме для топографічної інформації, можуть дати досить грубу модель.
Але точкові дані висот підходять і для нашого Topo To Raster. Можна так само вибірково оцифрувати певні точкові значення висот з топокарти і задати їх у якості вхідних даних. А можна, і це, мабуть, може здатися трохи дивним, взяти наші горизонталі й перевести їх у точки! Така ідея може виникнути після прочитання огляду інструментів GRASS, де ця операція потрібна для роботи багатьох із них. Перевести лінії в точки можна, наприклад, у QGIS інструментом Extract Nodes (Vector->Geometry Tools->Extract Nodes).
Ілюстрація інструменту
Далі ми пропонуємо ці горизонталі, переведені в точки, модулю Topo To Raster… й отримуємо результат дещо відмінний від обробки горизонталей-ліній. В цілому, це та сама ЦМР, яка має практично ті самі висоти (за кожною чарункою висота може трохи відрізнятися) і всі ті самі форми рельєфу, але при цьому має інші артефакти.

Артефакти моделі з точок
Така ЦМР краще показує рівні ділянки, бо вони позбавлені таких явних ребер, м’якіше і в цілому дещо менш детально показує круті ділянки, і замість ребер має «краплі», які місцями створюють подобу «апельсинової кірки». Очевидно, що «краплі» і їх скупчення – це наслідок нерівномірності даних, як і з лініями. Але все ж такий експеримент, на нашу думку, має сенс, адже ми побачили, що у дечому така модель має перевагу.
Практичні аспекти роботи з Topo To Raster
Розберемо детально практичну роботу з Topo to Raster: вхідні дані та параметри побудови моделі, які дозволили нам побудувати максимально детальну модель.
Інструмент Topo to Raster
Вхідні дані ми вже обговорили. Крім власне горизонталей, у нас є область обробки і горизонталі, що переведені в точки. Можливо, нам стали б у нагоді оцифровані обриви та озера, але поки ми обійшлися самими горизонталями. Більший вибір був стосовно параметрів обробки. Далі про них детальніше.
Вибір параметрів
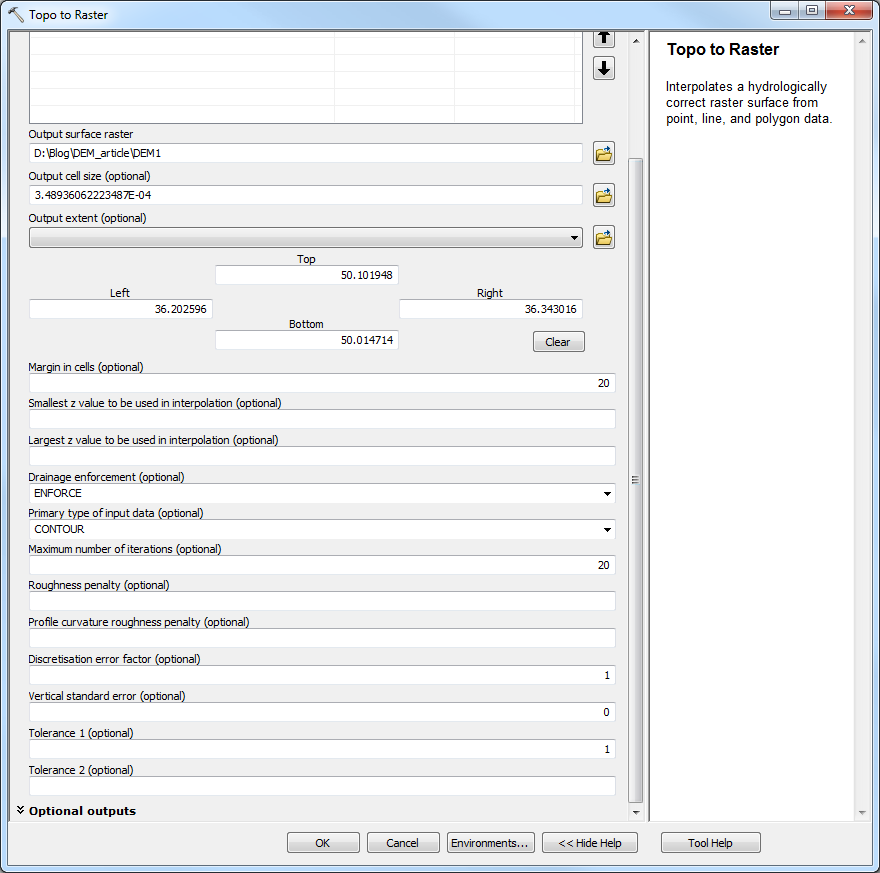
Параметрів побудови моделі багато:
cell_size – розмір чарунки (просторова роздільна здатність вихідної моделі),
extent – екстент (за відсутності файлу з межами),
margin – поля (відстань, на яку буде розширений процес інтерполяції за межі вхідного екстенту),
minimum_z_value – користувацьке мінімальне значення висоти,
maximum_z_value – користувацьке максимальне значення висоти, maximum_iterations – максимальна кількість ітерацій (проходжень інструментом по поверхні інтерполяції) та інші…
Всього аж 13 параметрів, із усіма можна ознайомитись на сторінці інструмента. Варто лише зауважити, що майже всі параметри (окрім вхідних даних) є опціональними. Хоча все ж варто приділяти їм увагу, бо, наприклад, просторова роздільна здатність за замовчуванням – це менше із висоти чи ширини екстенту вхідного набору даних – у тих одиницях, які використовуються у його системі координат, поділена на 250. Тобто можна здогадатися, якою грубою буде модель без належно виставленого параметру cell_size.
Також доступні вісім опціональних вихідних наборів даних. Це переважно набори даних, які можуть бути використані для оцінки якості отриманої ЦМР, а також файл з параметрами, який можна редагувати і використовувати у подальшій роботі і для нагадування, які параметри використовувалися для того чи іншого варіанта ЦМР.
Але повернемось до параметрів побудови моделі й розберемо, які з них представляли найбільший інтерес, як вони модифікувалися і як впливали на результат.
cell_size. Через відносно невеликий розмір території і порівняно невеликі перевищення виглядало логічним зробити досить детальну модель. В основному спроби виконувалися для просторової роздільної здатності 1, 2, 3, 4 і 10 м. Що вище роздільна здатність, то більше деталей містить ЦМР, але разом із тим – і більше видимих спотворень. Також, розмір чарунки, звичайно, впливає на швидкість створення ЦМР і об’єм використаної пам’яті (Topo To Raster – процес затратний з огляду на використання ОЗП). Оптимальною видалася ЦМР із роздільною здатністю ~3 м, яку потім можна було розтягнути до 1,5 м без суттєвої втрати якості (інструмент Resample, метод Bilinear).
Моделі різної роздільної здатності
Варто звертати увагу на одиниці виміру значень параметру cell_size. Якщо ми використовуємо географічну систему координат (напр., WGS 84), то значення параметру обраховуються у градусах, а якщо проектовану (напр., UTM Zone 37N), то в метрах. Так, якщо при роботі з вхідними даними у WGS 84, ми задамо роздільну здатність 1, то отримаємо розмір чарунки 1°, що, насмілюсь припустити, у випадку із нашою територією матиме вигляд… мабуть, одного пікселя. Щоб перевести градуси в метри слід використовувати unit conversion factor – коефіцієнт перетворення вимірювальних одиниць, який можна взяти із таблиці нижче (приблизний):
Фактор конверсії одиниць
| З | У | ||
| Фути | Метри | Градуси | |
| Фути | 1 | 0.3048 | 0.000003 |
| Метри | 3.28084 | 1 | 0.00001 |
(ось тут)
…або розрахувати більш точно за формулою для WGS84.
Discretisation error factor (discrete_error_factor). Цей параметр використовується для регулювання згладжування результату. Інтерес до нього був викликаний сподіваннями на те, що більші значення дозволять побороти ребристіть у моделі. Певне згладжування дійсно спостерігалось, але високі значення параметру призводили до генерування дивних «напливів». Зрештою, значення 1 (значення за замовчуванням) і 2 виявились найліпшими для нашої моделі.

Ілюстрація напливів
Primary type of input data (data_type). Параметр цікавий тим, що якщо обробляти горизонталі, що були переведені у точки, і залишити для цього параметру значення за замовчуванням CONTOUR, то результати виглядають дещо краще, ніж коли вибирати логічне у цьому випадку SPOT.
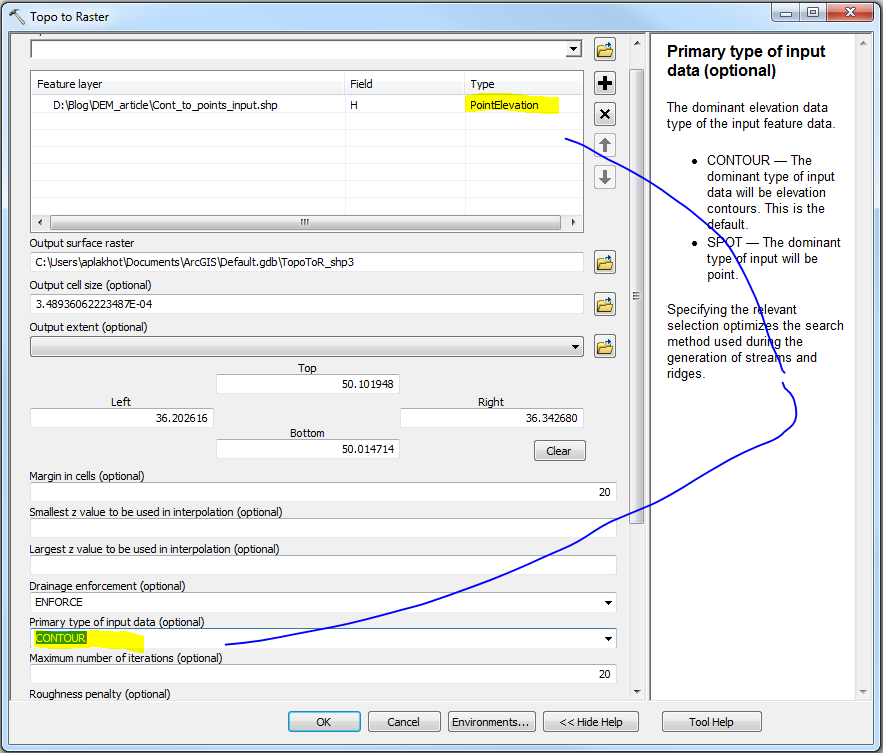
Contour vs. Spot

Решта параметрів або не робили явного впливу на результат побудови ЦМР, або були занадто складними для того, щоб зрозуміти, який же вплив вони чинять на результат.
Таким чином, тут я намагався розповісти про те, з чим довелося стикнутися під час створення DEM з контурних ліній. Сподіваюсь, що це корисно. А також у разі, якщо ви знаєте інші способи чи маєте поради, не соромтеся мене виправляти.

